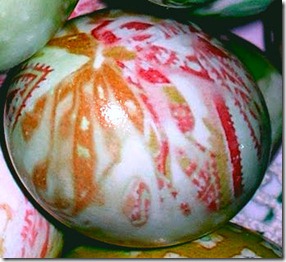
Well Easter is just a few weeks away and its time to make those wonderful Easter eggs that we all looked forward to growing up. I remember going out to my grandparents on Easter Sunday. The “farm” was always my favorite place on holidays because of grandma’s cooking and all the family that was there. I can still remember walking in and seeing eggs under the cabinets, and in window sills. I always wondered why the Easter bunny was so my better at hiding eggs at home than at my grandparents. I guess when the Easter bunny asked my grandfather to be his little helper, he didn’t realize that grandpa wasn’t such a good egg hider. Of course I had to race all my cousins around for the eggs, because of course they could see how not so hard they were hidden as well. Usually we just hung our close to the one we really wanted, or where there were a couple when grandma said it was time to start. Don’t you all wish we could go back to being kids again?
Now on to my latest find on the internet. I had never heard of dying eggs with anything but food coloring or vegetables (like beets). So when I came across using Tie’s to dye Easter eggs, I just knew this wasn’t going to work. But Ms. Martha Stewart says it can be done so I gave it a try. I was given a way to do it by someone who emailed me, but had to redo because it wasn’t her’s to share with me. So we are going to use Martha’s way of doing it, even though I used the other way.
First of all you get to go on a scavenger hunt. Either in your husbands or your closet, or even to the thrift store where I bought 11 ties this past weekend for 99cents each. Next you get to cut up your purchased or husbands ties into squares big enough to wrap around the egg and be tied at the top.
Also cut pieces of white t-shirts a little larger than the silk tie squares to wrap around the egg after it is wrapped in the silk. I also just purchased 2 large white t-shirts at the thrift store for this.
Now here’s the great part. all you do now is place egg(s) in an enamel or glass pot. Fill the pot with enough water to cover eggs completely, add three tablespoons of white vinegar to the water and bring water to a boil, turn heat down, and simmer for 40 minutes or longer.
You can now remove eggs from water and place on a cooling rack, and let cool. Once cooled, you can unwrap your new treasures to share with your friends and family. If you would like a shine to your eggs you can rub them with some vegetable oil to add some shine.
You can also use hollow eggs. Blowing out chicken eggs can be a little tricky though. The shells are quite fragile, and you have to be careful wrapping and tying the twine around them as well.
![]()
![]()


Be the first to comment